⚙️ OIDC Settings
OpenID Connect (OIDC) lets your users sign in to Booklore with the same account they use for all your other self-hosted apps. Instead of managing separate passwords, you delegate authentication to a central identity provider like Authentik, Keycloak, Authelia, or Pocket ID. Users click one button, authenticate once, and they're in.
Booklore's OIDC implementation handles the entire token exchange on the server side using the Authorization Code flow with PKCE, so secrets never touch the browser. It also supports back-channel logout, automatic user provisioning, and group-based permission mapping, giving you a complete SSO solution that scales from a single household to a busy shared server.
🔑 Login Methods
The OIDC settings page starts with a simple choice: which login methods should be available?

Local Login is the built-in username/password system. It's always on and cannot be fully disabled. Even if you switch entirely to OIDC, admins can still reach the local login form as a safety net (more on that in OIDC-Only Mode).
OIDC Login enables the "Sign in with <Provider>" button on the login page. Toggle this on once you've completed the provider configuration below.
You can run both methods side by side. Users who have both a local password and an OIDC identity can use either one. This is useful during a migration period or if some users prefer not to use SSO.
🌐 Provider Configuration
This is where you connect Booklore to your identity provider. You'll need to create a client/application in your provider first (the provider-specific guides walk through this), then enter the credentials here.
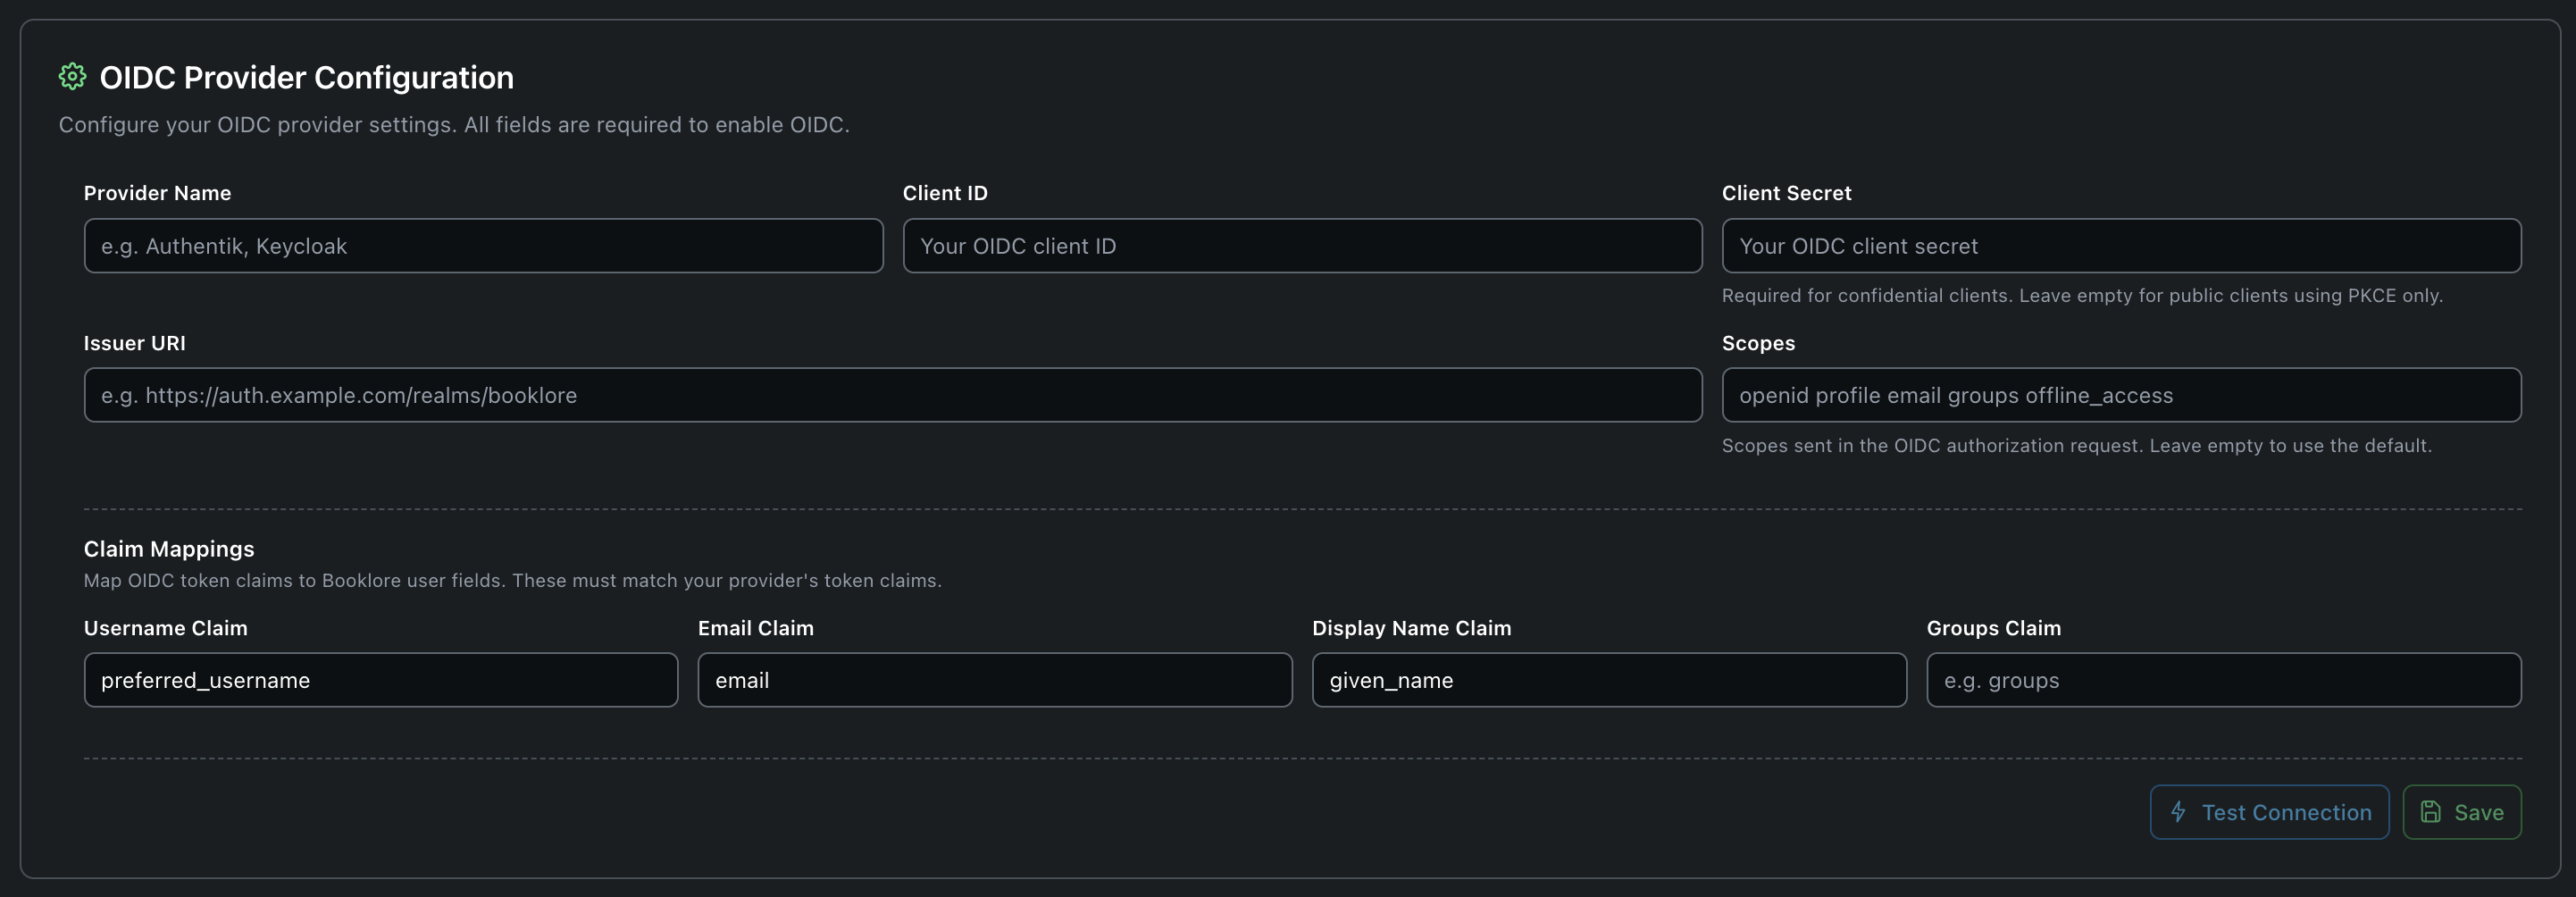
Connection Settings
| Field | What to enter | Notes |
|---|---|---|
| Provider Name | A human-readable name like Authentik or My SSO | Shown on the login button. Users see "Sign in with <this name>". |
| Client ID | The client/application ID from your provider | Copy this exactly from your provider's dashboard. |
| Client Secret | The client secret, if your provider requires one | Leave empty for public clients (most common for self-hosted setups using PKCE). Only needed for confidential clients. |
| Issuer URI | Your provider's OIDC issuer URL | Booklore appends /.well-known/openid-configuration to this URL to auto-discover all endpoints. |
| Scopes | Space-separated list of OIDC scopes | Defaults to openid profile email groups offline_access if left empty. For Microsoft Entra ID, use openid profile email offline_access (without groups). |
| Session Duration | How long OIDC sessions last (in hours) | Leave on "System default" unless you want OIDC sessions to differ from local ones. |
Most self-hosted identity providers work perfectly with public clients + PKCE, which is the more secure modern approach for browser-based apps. You don't need a client secret for this.
Use a confidential client (with a secret) only if your provider requires it or your security policy mandates it. Booklore supports both.
Finding Your Issuer URI
The issuer URI varies by provider. Here are common patterns:
| Provider | Issuer URI Pattern |
|---|---|
| Authentik | https://auth.example.com/application/o/<app-slug>/ |
| Keycloak | https://keycloak.example.com/realms/<realm-name> |
| Authelia | https://auth.example.com |
| Pocket ID | https://pocket-id.example.com |
Claim Mappings
OIDC providers send user information as "claims" inside tokens. Different providers use different claim names for the same data. Claim mappings tell Booklore which claim to read for each user field.
| Booklore Field | Default Claim | What it does |
|---|---|---|
| Username | preferred_username | Becomes the Booklore username. This is what users see in the app, and it's how Booklore matches returning OIDC users to existing accounts. |
email | The user's email address. Used for notifications and email-to-device features. | |
| Display Name | name | Shown in the UI as the user's name. Falls back to the username if not provided. |
| Groups | groups | A list of group names from the provider. Used for Group Mapping to automatically assign permissions. |
If your provider sends JohnDoe but the Booklore account is johndoe, the login will fail. Make sure usernames match exactly. When in doubt, use the preferred_username claim, which most providers set to a lowercase value.
Common Claim Names by Provider
Not sure what claim names your provider uses? Here's a quick reference:
| Provider | Username | Display Name | Groups | |
|---|---|---|---|---|
| Authentik | preferred_username | email | name | groups |
| Keycloak | preferred_username | email | name | groups (requires mapper) |
| Authelia | preferred_username | email | name | groups |
| Pocket ID | preferred_username | email | name | groups |
Test Connection
Before saving, click Test Connection to make sure Booklore can talk to your provider. The test runs a series of checks:
- Discovery document reachable
- Authorization, token, and JWKS endpoints present
- Signing keys fetchable
- Required scopes (openid, profile, email) supported
- PKCE (S256) supported
- End session endpoint available (needed for single logout)
- Back-channel logout supported
Checks that pass show a green checkmark. Warnings (yellow) mean the feature will work but some optional capability isn't available. Failures (red) must be fixed before OIDC will work.
📋 Provider Configuration Reference
Once you save your provider configuration, Booklore shows a reference panel with the exact values you need to paste into your identity provider's client settings. Each value has a copy button.
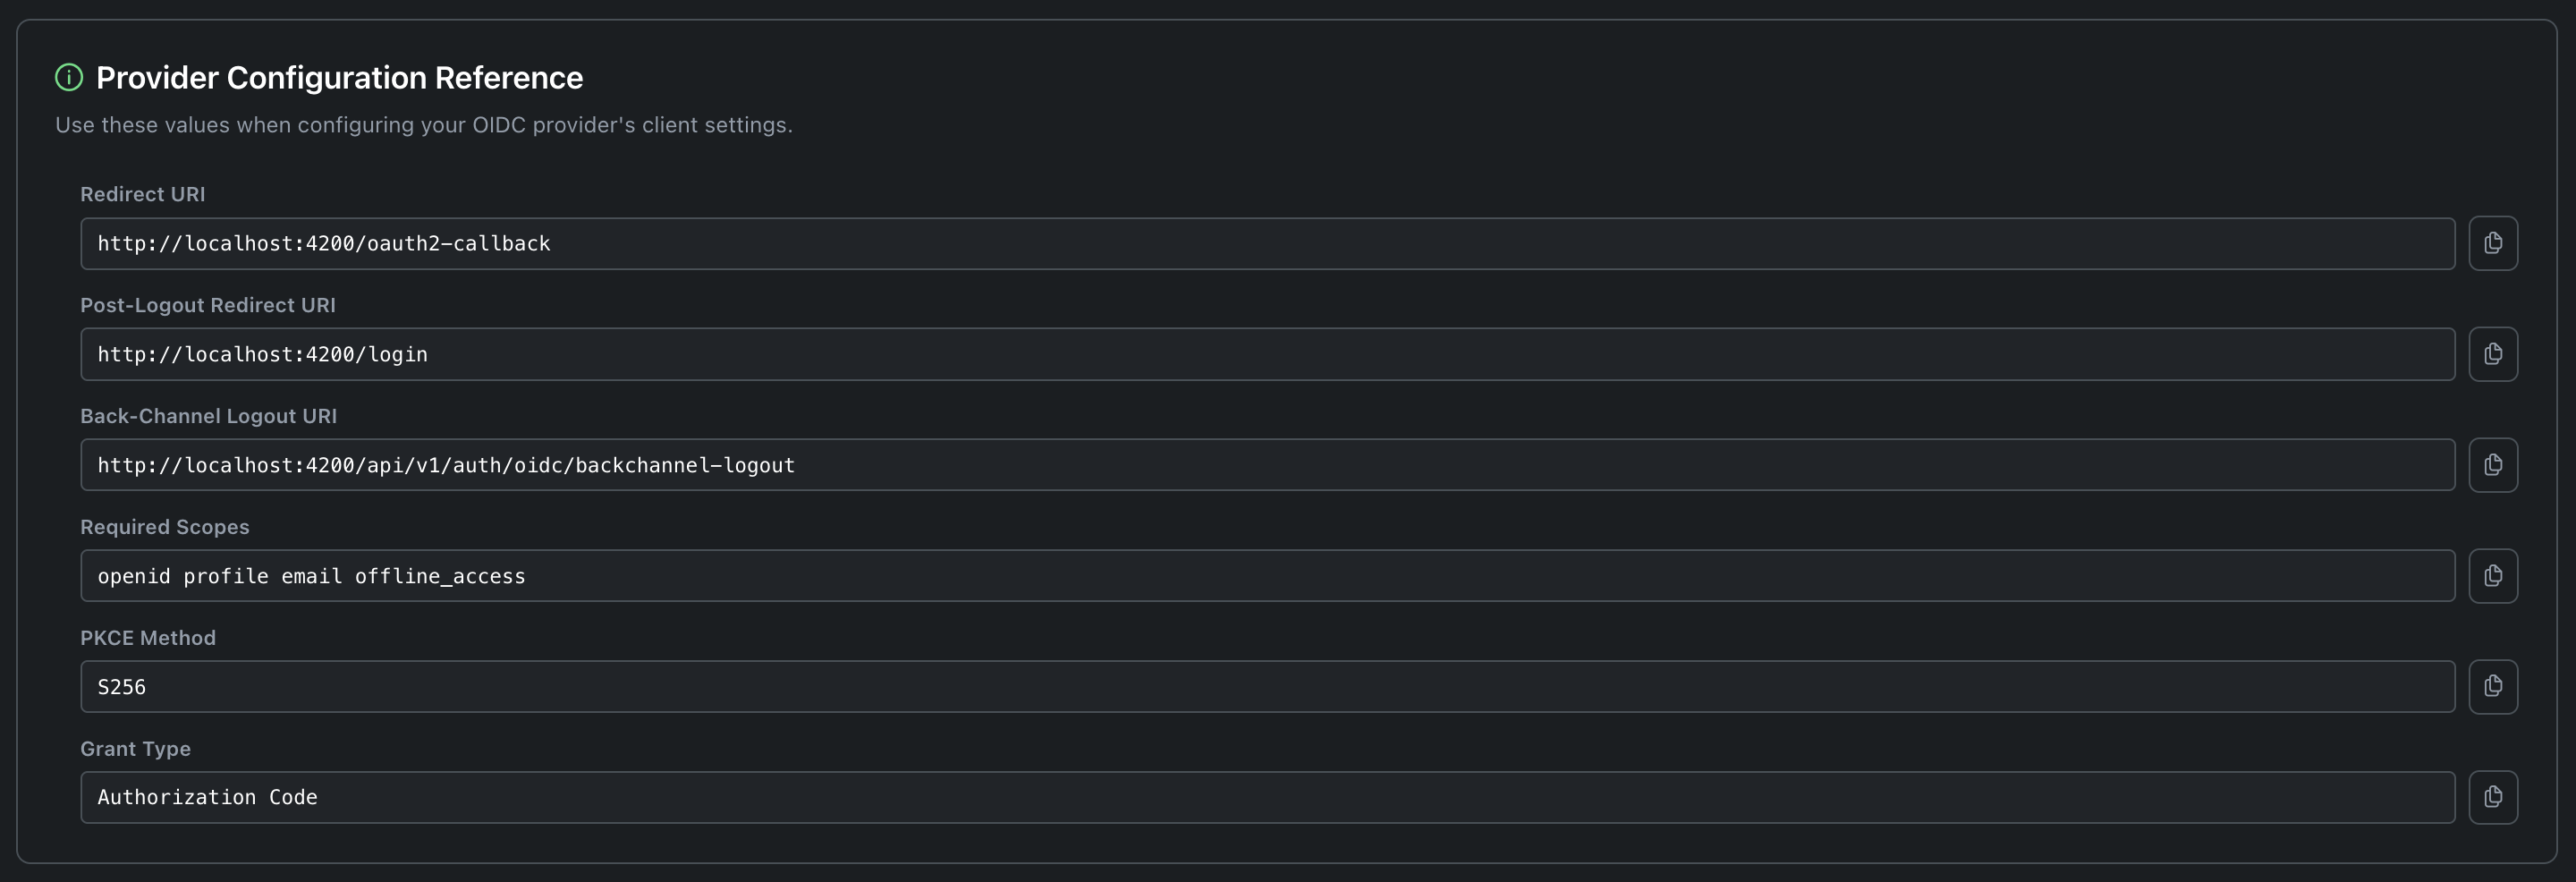
These values are auto-generated based on your Booklore instance URL. You don't need to edit them; just copy them into your provider.
| Value | Where to put it in your provider | Example |
|---|---|---|
| Redirect URI | Allowed redirect URIs / Callback URL | https://books.example.com/oauth2-callback |
| Post-Logout Redirect URI | Post-logout redirect URIs | https://books.example.com/login |
| Back-Channel Logout URI | Back-channel logout URL | https://books.example.com/api/v1/auth/oidc/backchannel-logout |
| Required Scopes | Allowed/assigned scopes | openid profile email offline_access |
| PKCE Method | PKCE code challenge method | S256 |
| Grant Type | Allowed grant types | Authorization Code |
When a user logs out from your identity provider (for example, clicking "Log out" in Authentik), back-channel logout tells Booklore to immediately end that user's session. Without it, the user would stay logged in to Booklore until their token expires, even though they've already logged out everywhere else.
This is a server-to-server call, so the Back-Channel Logout URI must be reachable from your provider's server, not just from the user's browser. If your provider and Booklore run on the same Docker network, use the internal hostname (e.g., http://booklore:8080/api/v1/auth/oidc/backchannel-logout).
🚫 OIDC-Only Mode
If you want all users to authenticate exclusively through your identity provider, with no password-based fallback.

When you enable OIDC-Only Mode:
- The local login form disappears from the login page
- Non-admin users visiting
/loginare automatically redirected to the OIDC provider - Users can only authenticate through your identity provider; there is no password fallback
This is ideal when you want your OIDC provider to be the single gatekeeper for access, handling MFA, conditional access policies, and account lifecycle centrally.
Admins always have a way in. Navigate to /login?local=true to reach the local login form, even in OIDC-Only Mode. Bookmark this URL for emergencies.
When Things Go Wrong
If your OIDC provider goes down or a misconfiguration locks everyone out:
Option 1: Use the admin backdoor URL:
https://books.example.com/login?local=true
Option 2: Disable OIDC entirely at the infrastructure level by adding an environment variable to your Docker Compose or system config:
services:
  booklore:
    environment:
      - FORCE_DISABLE_OIDC=true
Restart Booklore. OIDC is now completely disabled regardless of database settings. Remove the variable once you've fixed the issue.
👥 User Provisioning
When someone logs in via OIDC for the first time, what should happen? User provisioning controls whether Booklore creates the account automatically and what permissions it starts with.
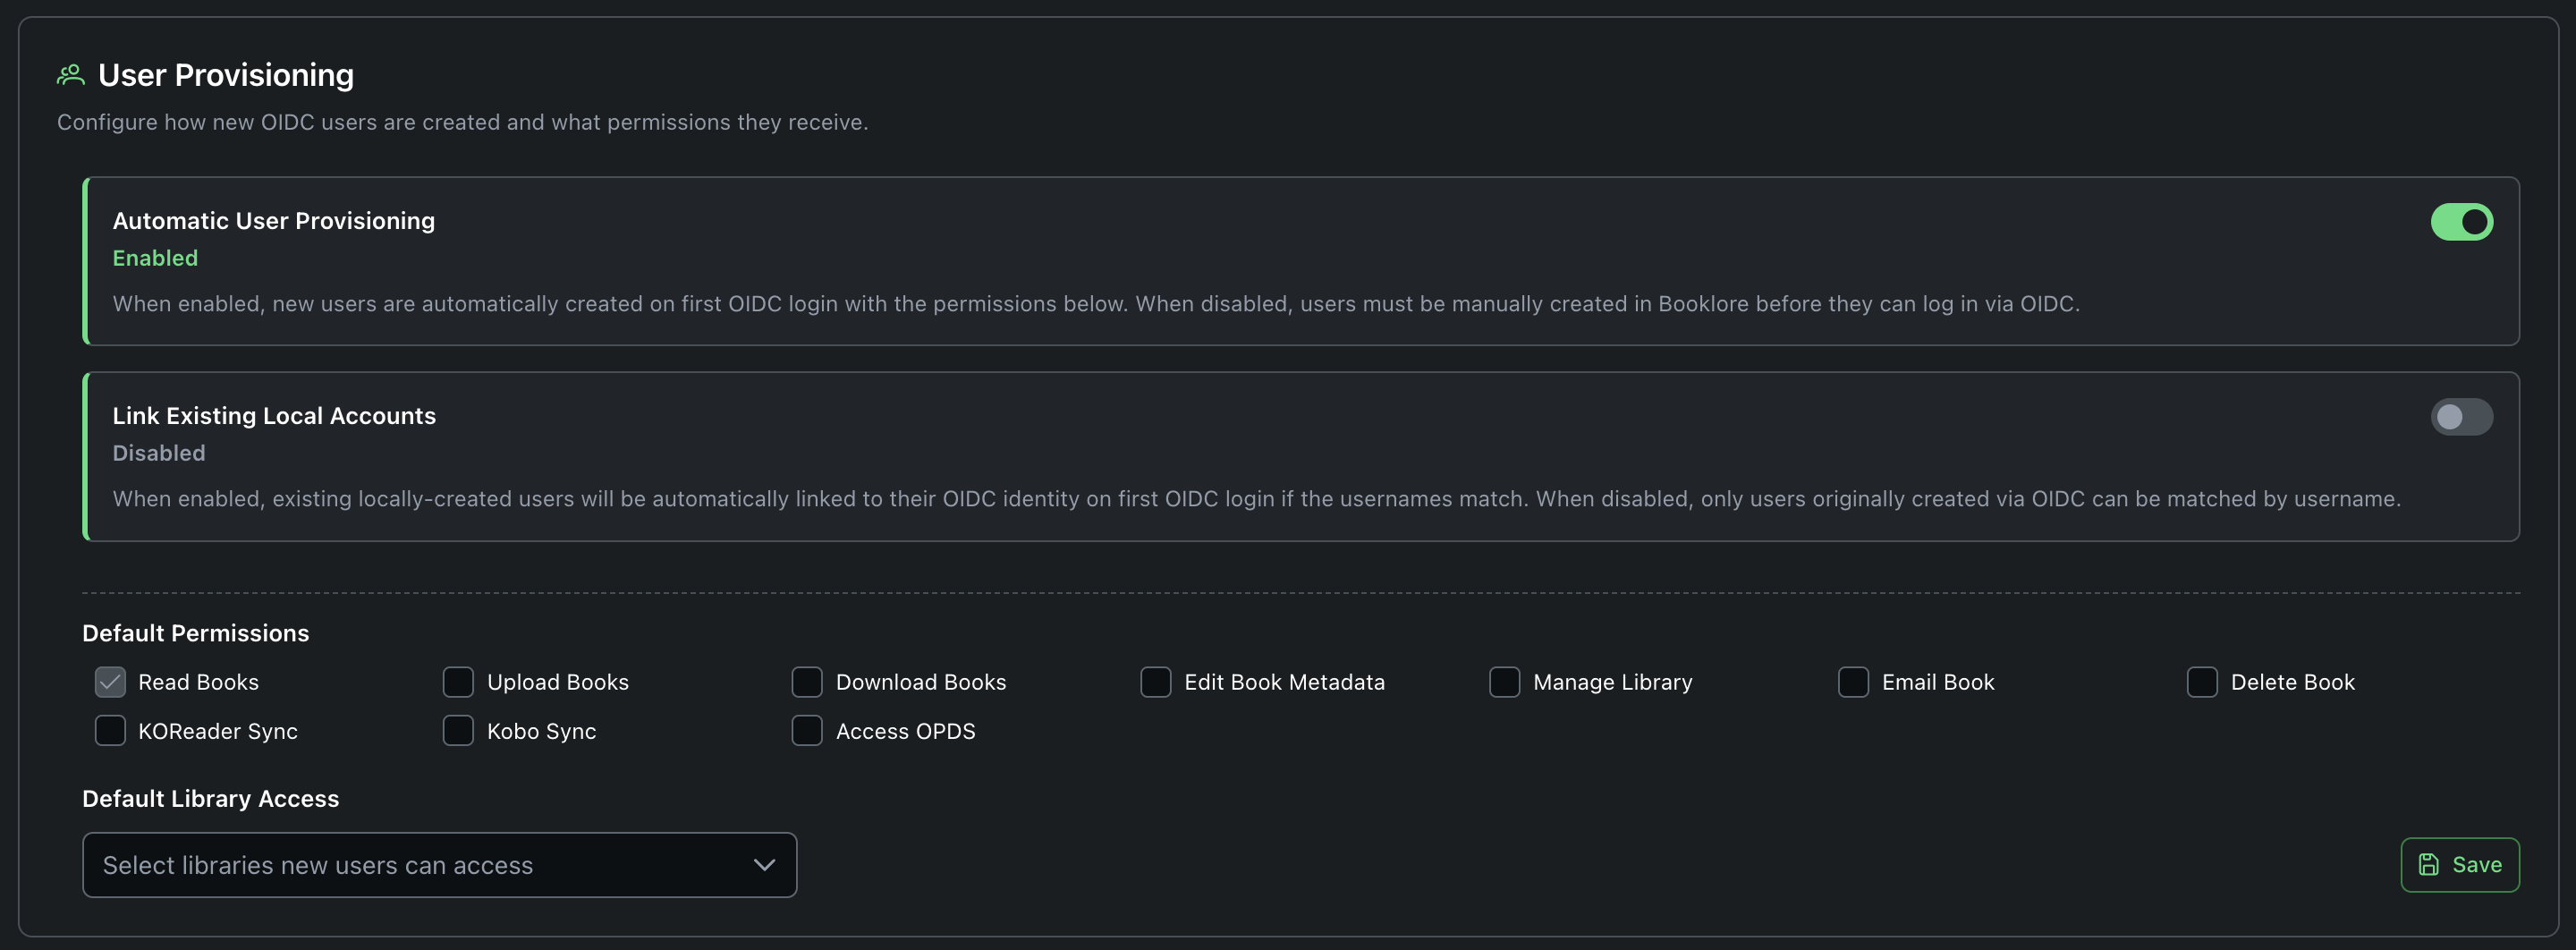
Automatic User Provisioning
Enabled (recommended for most setups): Any user who successfully authenticates through your OIDC provider gets a Booklore account automatically. No admin action needed. The account is created with the default permissions and library access you configure below.
Disabled: Users must be manually created in Booklore before they can log in via OIDC. The admin creates the user with a username that exactly matches the OIDC username claim. Good for high-security environments where you want explicit approval for every user.
Link Existing Local Accounts
This setting matters when you're migrating from local authentication to OIDC and you have existing users who already have reading progress, bookmarks, and shelves.
Enabled: When a user logs in via OIDC and a local account with the same username already exists, Booklore automatically links the OIDC identity to that account. The user keeps everything: reading progress, bookmarks, shelves, permissions, library access. The account is upgraded to OIDC authentication.
Disabled: Local accounts and OIDC accounts are kept separate. Only accounts originally created through OIDC (or already linked) can be matched.
If you're transitioning an existing Booklore instance from local auth to OIDC:
- Enable "Link Existing Local Accounts"
- Enable OIDC but keep local login available
- Ask users to log in via OIDC once. Their accounts are automatically linked.
- Once everyone has migrated, optionally enable OIDC-Only Mode
- Disable "Link Existing Local Accounts" (no longer needed)
Default Permissions
Choose what newly provisioned users can do. These permissions are applied once when the account is created. You (or group mapping) can change them later.
Available default permissions:
| Permission | What it allows |
|---|---|
| Read Books | View and read books (always granted) |
| Upload Books | Add new books to libraries |
| Download Books | Download book files |
| Edit Book Metadata | Modify book titles, authors, tags, etc. |
| Manage Library | Create, edit, and organize libraries |
| Email Book | Send books to email/e-reader |
| Delete Book | Remove books from libraries |
| KOReader Sync | Sync reading progress with KOReader devices |
| Kobo Sync | Sync books and progress with Kobo e-readers |
| Access OPDS | Browse books via OPDS catalog feeds |
Grant only Read Books and Download Books by default. You can always expand permissions later, but revoking access is harder once users are accustomed to it. Use Group Mapping if different users need different permission sets.
Default Library Access
Select which libraries new users can access. Users only see books in their assigned libraries, so this controls their initial view of your collection. You can assign additional libraries per-user later.
🏷️ Group Mapping
Group mapping is the most powerful feature of Booklore's OIDC integration. It lets you define permission sets in your identity provider using groups, and Booklore automatically applies the right permissions and library access based on which groups a user belongs to.
Instead of manually configuring each user's permissions in Booklore, you manage everything in your identity provider. Move a user to a different group in Authentik or Keycloak, and their Booklore access updates on next login.
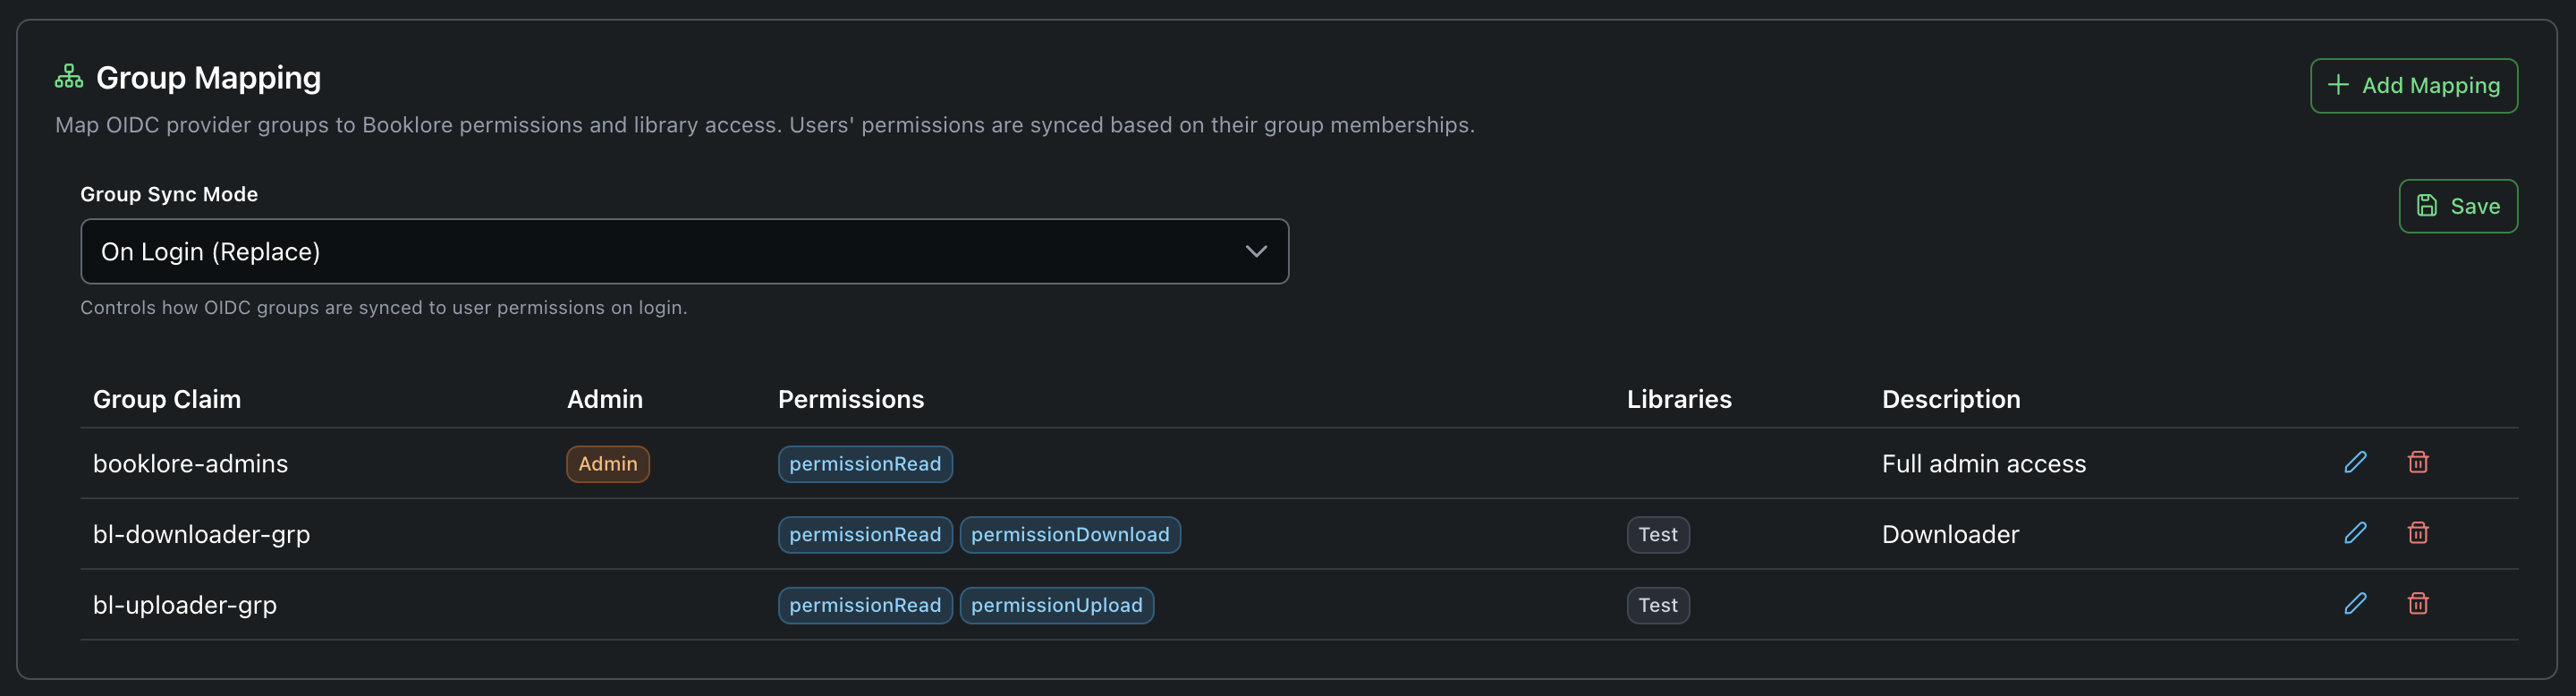
Group Sync Mode
The sync mode determines how group mappings are applied on each login.
| Mode | What happens on each login | Best for |
|---|---|---|
| Disabled | Nothing. Group mappings exist but aren't applied. | When you want to define mappings in advance but aren't ready to use them yet. |
| On Login (Replace) | The user's permissions and libraries are completely replaced by what their group mappings define. Any manual changes made in Booklore are overwritten. | Setups where the identity provider is the single source of truth for access control. Most common choice. |
| On Login (Additive) | Group-mapped permissions are added on top of existing permissions. Nothing is ever removed. | Mixed environments where some permissions are managed via groups and others are granted manually in Booklore. |
In Replace mode, if an admin manually grants a user extra permissions in Booklore, those changes are lost the next time the user logs in via OIDC. All permissions come from group mappings only. Make sure your group mappings cover everything users need before enabling this mode.
Creating Group Mappings
Click Add Mapping to define a new mapping. Each mapping links an OIDC group to a set of Booklore permissions.
| Field | What to enter | Example |
|---|---|---|
| Group Claim | The exact group name as it appears in the OIDC token's groups claim. Case-sensitive. | booklore-admins |
| Admin | Check this to grant full admin access to users in this group. | ✓ |
| Permissions | Select which permissions to grant. | Read, Download, Upload |
| Libraries | Select which libraries this group can access. | Main Library, Comics |
| Description | An optional note for your own reference. | Full admin access |
How Merging Works
Users often belong to multiple groups. Booklore handles this by merging all matching group mappings together:
Example: Sarah belongs to two groups in Authentik: booklore-readers and booklore-uploaders.
| Group | Permissions | Libraries |
|---|---|---|
booklore-readers | Read, Download | Fiction, Non-Fiction |
booklore-uploaders | Read, Upload | Fiction, Staging |
Sarah receives the union of both mappings:
- Permissions: Read, Download, Upload
- Libraries: Fiction, Non-Fiction, Staging
If any matching group has the Admin flag checked, the user becomes an admin.
Setting Up Groups in Your Provider
For group mapping to work, your OIDC provider must include group names in the token. Here's how to enable this for common providers:
Authentik
Groups are included automatically in the groups claim. No extra configuration needed. Set the Groups Claim in Booklore to groups.
Keycloak
Groups are not included by default. You need to add a mapper:
- Go to your Keycloak realm > Client Scopes >
booklore-dedicated(or your client's scope) - Click Add mapper > By configuration > Group Membership
- Set:
- Name:
groups - Token Claim Name:
groups - Full group path: OFF (so you get
my-groupinstead of/parent/my-group)
- Name:
- Save
Set the Groups Claim in Booklore to groups.
Authelia
Add groups to your client's scopes in the Authelia configuration:
identity_providers:
  oidc:
    clients:
      - client_id: booklore
        scopes:
          - openid
          - profile
          - email
          - groups
Set the Groups Claim in Booklore to groups.
🔧 Real-World Examples
Family Setup: Simple SSO, No Groups
A home server with a few family members. You just want everyone to sign in with one click.
What to configure:
- Provider: Pocket ID (lightweight, easy to set up)
- Auto Provisioning: Enabled
- Link Local Accounts: Enabled (if migrating from passwords)
- Default Permissions: Read, Download
- Default Libraries: Family Library
- OIDC-Only Mode: Disabled (keep password login as backup)
- Group Mapping: Disabled (not needed for a few users)
Booklore settings:
| Setting | Value |
|---|---|
| Provider Name | Pocket ID |
| Client ID | booklore |
| Client Secret | (empty) |
| Issuer URI | https://pocket-id.home.lan |
| Scope | openid profile email offline_access |
Docker Compose snippet:
services:
  booklore:
    image: booklore/booklore:latest
    ports:
      - "8080:8080"
    volumes:
      - ./data:/data
      - /mnt/books:/books
That's it. No special environment variables needed. Configure OIDC in the admin UI, and family members can sign in with Pocket ID.
Homelab: Multiple Apps, Role-Based Access
A homelab with 10-20 users, several libraries (Fiction, Non-Fiction, Comics, Audiobooks), and different access levels. You manage users centrally in Authentik.
What to configure:
- Provider: Authentik
- Auto Provisioning: Enabled
- Link Local Accounts: Enabled initially, disable after migration
- Default Permissions: Read only (group mapping handles the rest)
- OIDC-Only Mode: Enabled (everyone uses Authentik)
- Group Sync Mode: On Login (Replace)
Group mappings:
| Group Claim | Admin | Permissions | Libraries | Description |
|---|---|---|---|---|
booklore-admins | Yes | Read | (all) | Server admins |
booklore-power-users | No | Read, Download, Upload, Edit Metadata, KOReader Sync, Kobo Sync, OPDS | Fiction, Non-Fiction, Comics, Audiobooks | Trusted users with full access |
booklore-readers | No | Read, Download, OPDS | Fiction, Non-Fiction | Regular readers |
booklore-kids | No | Read | Kids Library | Children's accounts |
How it works in practice:
- You create these groups in Authentik and assign users to them
- When a new user (let's say "Alex") logs into Booklore for the first time via Authentik, Booklore auto-creates their account
- Alex is in the
booklore-readersgroup, so they get Read + Download + OPDS access to Fiction and Non-Fiction - Later, you move Alex to
booklore-power-usersin Authentik - Next time Alex logs in, Booklore automatically upgrades their permissions and grants access to Comics and Audiobooks
- No manual Booklore admin work needed
Locked-Down Setup: Confidential Client, No Auto-Provisioning
A shared server where you want tight control over who gets access. All authentication goes through Keycloak with a confidential client, and users must be pre-approved.
What to configure:
- Provider: Keycloak (confidential client)
- Auto Provisioning: Disabled (users must be pre-approved)
- OIDC-Only Mode: Enabled
- Group Sync Mode: On Login (Replace)
- Session Duration: 8 hours
Booklore settings:
| Setting | Value |
|---|---|
| Provider Name | Keycloak |
| Client ID | booklore-prod |
| Client Secret | a1b2c3d4-e5f6-7890-abcd-ef1234567890 |
| Issuer URI | https://keycloak.example.com/realms/myrealm |
| Scope | openid profile email offline_access |
| Session Duration | 8 |
Group mappings:
| Group Claim | Admin | Permissions | Libraries | Description |
|---|---|---|---|---|
booklore-admins | Yes | Read | All | Server admins |
booklore-users | No | Read, Download | Main Library, Shared | Standard user access |
booklore-curators | No | Read, Download, Upload, Edit Metadata, Email Book | Main Library, Shared, Staging | Curators who manage the collection |
Docker Compose snippet:
services:
  booklore:
    image: booklore/booklore:latest
    ports:
      - "8080:8080"
    volumes:
      - ./data:/data
      - /mnt/books:/books
New users are created manually in Booklore by an admin (auto provisioning is off), but their permissions are managed entirely through Keycloak groups.
🔄 How the Login Flow Works
Understanding what happens behind the scenes helps when troubleshooting. Here's the complete flow when a user clicks "Sign in with <Provider>":
-
User clicks the OIDC login button on the Booklore login page
-
Booklore generates security parameters: A random state token (stored server-side for CSRF protection), a PKCE code verifier and challenge (stored in the browser's session storage), and a nonce
-
Browser redirects to the identity provider with the authorization request, including the code challenge, state, nonce, and requested scopes
-
User authenticates with the provider (password, MFA, biometrics, whatever the provider requires)
-
Provider redirects back to Booklore with an authorization code and the original state
-
Booklore's backend exchanges the code for tokens by calling the provider's token endpoint directly (server-to-server). This is where the code verifier proves the request came from the same session that started the flow. If a client secret is configured, it's sent here too.
-
Backend validates the ID token: Checks the signature against the provider's public keys (JWKS), verifies the issuer, audience, expiration, nonce, and other security claims
-
Backend extracts user information from the token claims and optionally the userinfo endpoint
-
User is matched or created in Booklore (based on provisioning settings)
-
Group mappings are applied (if configured)
-
Booklore issues its own session tokens and the user is logged in
The entire token exchange happens on the server. The browser never sees the OIDC access token, refresh token, or ID token.
🛠️ Troubleshooting
OIDC Login Button Not Appearing
- OIDC Login must be toggled on in Login Methods
- Provider Name, Client ID, and Issuer URI must all be filled in and saved
- If you just saved settings, refresh the login page
Test Connection Fails
- The Issuer URI must be reachable from the Booklore server (not from your browser). If running in Docker, use the container network name or ensure the container can reach the external URL.
- Try curling the discovery endpoint from the Booklore server:
curl https://auth.example.com/application/o/booklore/.well-known/openid-configuration - Check for trailing slash issues. Some providers require a trailing slash, others don't.
Login Redirects to Provider But Comes Back with an Error
- Redirect URI mismatch: The redirect URI configured in your provider must exactly match what Booklore generates. Copy it from the Provider Configuration Reference panel. Common mistakes: missing
/oauth2-callbackpath, wrong port,httpvshttps. - Scopes not allowed: Make sure
openid,profile,email, andoffline_accessare all enabled in your provider's client configuration. - Wrong Client ID or Secret: Double-check these values. A single extra space can cause a failure.
- Check Booklore application logs (
docker logs booklore) for a specific error message.
User Logs In But Gets "User Not Provisioned"
This means auto-provisioning is disabled and no Booklore account matches the OIDC username. Either:
- Enable auto-provisioning, or
- Manually create a Booklore account with a username that exactly matches the OIDC
preferred_usernameclaim (case-sensitive)
Group Permissions Not Being Applied
- Is the Groups Claim configured? Check the Claim Mappings section. The default is
groups. - Does your provider actually send groups? Not all providers do by default. See the provider-specific instructions above.
- Is Group Sync Mode enabled? It defaults to Disabled. Set it to On Login (Replace) or On Login (Additive).
- Do group names match exactly? Group claim values are case-sensitive.
Booklore-Adminsis not the same asbooklore-admins. Check what your provider actually sends by inspecting the token (most providers have a token preview feature).
Sessions Not Syncing (User Stays Logged In After Provider Logout)
- Back-channel logout must be configured in your provider. Copy the Back-Channel Logout URI from the reference panel.
- The logout URI must be reachable from the provider's server, not from the browser. If they're on the same Docker network, use the internal hostname.
- Not all providers support back-channel logout. If yours doesn't, users will stay logged in to Booklore until their session expires naturally.
Locked Out After Enabling OIDC-Only Mode
Two escape hatches:
- Admin backdoor URL:
https://books.example.com/login?local=true - Environment variable override: Add
FORCE_DISABLE_OIDC=trueto your Docker Compose and restart
Auto-Redirect Loop
If OIDC-Only Mode is enabled and the provider keeps bouncing back with errors, Booklore has built-in loop protection. After 3 failed redirect attempts, it stops auto-redirecting and shows an error message on the login page with a link to the local login form.